How to create a Unity Custom Inspector
Make the Inspector work for you!
Making a Custom Inspector is easy enough. Getting it to do what you want can be challenging, however. It’s worth the effort, though, if it speeds your workflow when you use it.
Here’s how to start: Remember that public and serializable members of your Unity components (the ones you subclass from Monobehaviour) are visible in the standard Inspector. So let’s start with that and build up from there.
A very simple Unity component might have just a bit of data in it:
using UnityEngine;

public class MyClass : MonoBehaviour
{
    public float mass = 169.2f;
    public string words = "None shall pass!";

    [SerializeField]
    private bool isGood = true;
    private int count = 42;
}
Drop that onto a GameObject and Unity’s built-in Inspector presents three of those four fields like this:
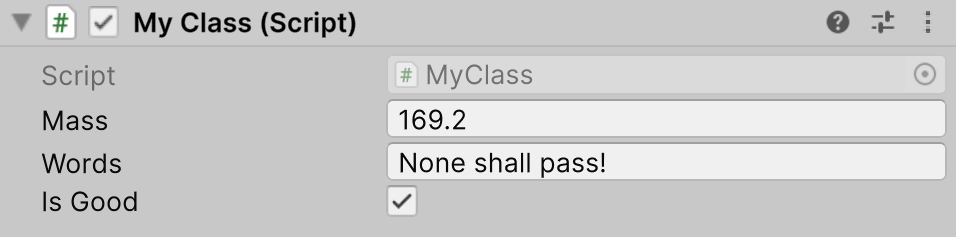
That looks familiar, right? The fourth field, count, isn’t shown because it isn’t public and it isn’t marked with a [SerializeField] attribute.
For a lot of your components, that’s all you need the Inspector to do, so using the built-in Inspector is good enough. But what if you want something a little more sophisticated? For example, suppose you want to manage a minimum and a maximum for, say, an angle. If you are expressing your angles in degrees, a reasonable range might be from -360 to 360. So, you don’t want the the Inspector to allow angles outside that range. To get the Inspector to enforce your limit, you need a Custom Inspector.
Follow these steps:
- Create a folder called “Editor”
- Create a C# script called “MyClassEditor”
- Replace its code with this:
using UnityEditor; using UnityEngine.UIElements; [CustomEditor(typeof(MyClass))] public class MyClassEditor : Editor { public override VisualElement CreateInspectorGUI() { VisualElement root = new(); return root; } } - Let Unity compile
MyClassEditor
That’s it! You’ve made a Custom Inspector. When you select your GameObject with your MyClass component on it now, it looks like there’s almost no Inspector at all:

But that’s because your Custom Inspector, although it exists and Unity is using it to replace its built-in Inspector, doesn’t have the code it needs to show you anything. We’ll add that next, but first, let’s go over the steps we just went through, in a bit more detail.
The Editor folder
You can put any number of folders called “Editor” anywhere you want to put them in your Assets folders. Unity will exclude whatever is in them when you build a stand-alone version of your game. That’s important because you’re going to be using Unity classes that are necessary for a Custom Inspector, but aren’t allowed to be part of a stand-alone build. Putting that code in a folder called “Editor” takes care of that by not including them in your builds.
The MyClassEditor class
You can name your CustomInspector class anything you want, but it’s probably a good idea to name it classEditor, where class is the name of the class you will use it to inspect. That’s a nice, self-documenting way to keep your code organized and easy to understand, both for others and for yourself in a few weeks when you’ve forgotten all about this and need to look at it again.
Note that MyClassEditor starts with this line:
using UnityEditor;
That gives you access to the classes in the UnityEditor namespace, one of which is Editor, the class your Custom Inspector is subclassing.
Note also that MyClassEditor includes this line:
using UnityEngine.UIElements;
That gives you access to the classes in Unity’s UI Toolkit, including VisualElement, which your starting Custom Inspector is already using.
Your Custom Inspector needs this attribute so Unity knows what class to use it for:
[CustomEditor(typeof(MyClass))]
The line that declares your Custom Inspector is next:
public class MyClassEditor : Editor
Remember that your Custom Inspector subclasses Editor, not MonoBehaviour. Editor is actually a subclass itself, of Unity’s ScriptableObject class. We’ll make use of that later, but the important thing now is to make your Custom Inspector class a subclass of Editor.
The CreateInspectorGUI method
Finally, your Custom Inspector contains only one method (so far). Here it is:
    public override VisualElement CreateInspectorGUI()
    {
        VisualElement root = new();
        return root;
    }
If you haven’t used the C# override keyword before, you are in for a treat. It’s how C# gives you the ability to use one of the most powerful features of an object oriented language. The feature has a fancy name, “polymorphism,” but the idea is, itself, pretty simple: The Editor class has a method defined already called CreateInspectorGUI that takes no arguments and returns a reference to a VisualElement object, but using override lets us replace that method with our own version. This means code that calls our Custom Inspector’s CreateInspectorGUI method thinks it is working with an object of type Editor but, because it will really be working with an object of type MyClassEditor, it will be calling our version of CreateInspectorGUI instead.
NOTE: You can learn more about polymorphism from my video about it.
Our version has two lines in it. The first creates a new VisualElement object, storing a reference to it in root. (Note that we did not have to say new VisualElement() to create the object. We could do that, but C# 9.0 let’s you leave out the type of the object you are creating when the compiler can infer the type from context. Here, it can infer we are creating a VisualElement object from the fact that we are assigning its reference to a variable of type VisualElement.)
The second line just returns the reference to our new VisualElement object.
For our Custom Inspector to actually show us anything, we’ll add more code between those two lines, building what’s called a “visual tree” of objects, all of which grow from (surprise!) our root variable. That’s where we get to decide what we see, how it will look, and what other code our Custom Inspector can run based on, among other things, what the values in the component we’re inspecting are.
We’ll do that in the next article.
Leave a comment
Log in with itch.io to leave a comment.