Popup Windows in a Custom Inspector
Talking Back to the Developer
We’ve made our Custom Inspector do some validation on input by making sure the user/developer can’t set the mass field of our MyClass component to a negative number. That’s great from the point of view of protecting our game from settings that might produce nonsense results (or worse). But it’s not helping the developer know why the input can’t be less than zero. Worse, the developer may not even notice when our Custom Inspector changes their negative input to zero.
We want a way to let the developer know both when and why the number they’ve supplied gets changed. We can do some of that with a “ToolTip,” but we’ll also use a “Popup Window,” to make our Custom Inspector do a better job of communicating with the developer.
ToolTips
We’ll start with ToolTips, as they’re easy and all good IDE’s should use them liberally. Just add this line to your CreateInspectorGUI method:
massField.tooltip = "This will set how hard it pulls. Negative numbers will automatically be set to zero";
Floating your mouse cursor over the FloatField makes it appear:
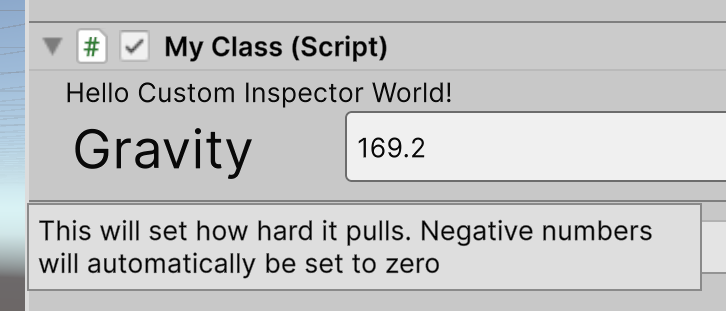
Note that Unity has word-wrapped the text, so the little window used to show it is two lines high, and not extremely wide. That will typically format things well enough for you, but you can take more explicit control if you want to, by inserting newline characters where you want a line to end:
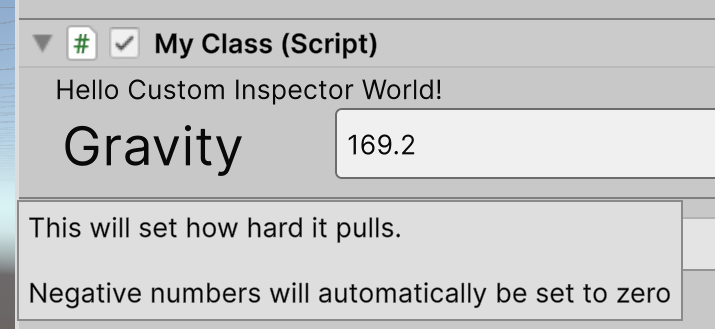
massField.tooltip = "This will set how hard it pulls.\n\nNegative numbers will automatically be set to zero";
Note that the text is still a single string in your code, but on your screen, it looks like this:
You can even use a bit of text formatting:
massField.tooltip = "This will set how <b>hard</b> it <size=36>pulls</size>.\n\nNegative numbers will <i>automatically</i> be set to <color=red>zero</color>";
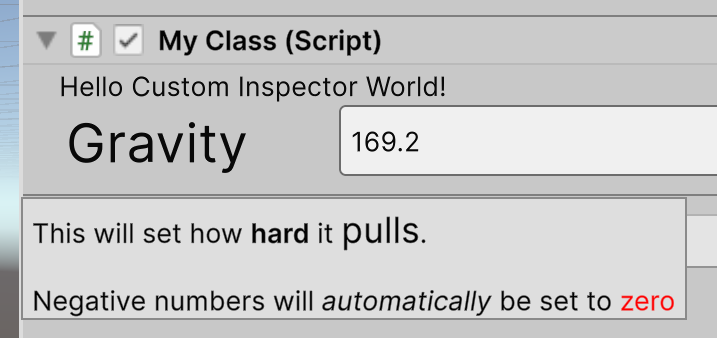
This can be hard to make compatible with both light and dark themes, however, and the results are not always what you expect. A small amount of bold or italic text might be useful, here and there, but don’t get carried away.
Reacting to Input
ToolTips are fine for what they do. However they only do what they do on demand. That is, the developer has to float the mouse cursor over the part of the Inspector that makes them appear. You should use them! But we can do more to tell the developer when they have entered unacceptable data by making something similar to a ToolTip appear.
A PopupWindow lets you display text that looks a lot like a ToolTip when you want to. The window will stay visible until the developer clicks on something or otherwise changes the focus.
NOTE: The PopupWindow class we are talking about here is in the UnityEditor namespace. There is another PopupWindow class in the UnityEngine.UIElements namespace. We'll be using that later, but it's not involved in making a window appear briefly, which is what we're doing here. |
You create a PopupWindow by first creating a subclass of PopupWindowContent and overriding its CreateGUI method. You’ll notice that CreateGUI is of type VisualElement, which means we will again be creating a visual tree. But we know how to do that!
Try this code:
using UnityEditor;
using UnityEngine.UIElements;

public class PopupExample : PopupWindowContent
{
    public override VisualElement CreateGUI()
    {
        VisualElement root = new();
        Label info = new Label("Please enter a positive value.");

        root.Add(info);
        return root;
    }
}
As with your Custom Inspector, your code creates a root VisualElement, then adds a Label. Nothing much new here, but the PopupExample object does need to be given to another method to make the window actually appear.
In your OnMassFieldBlur method, add this after setting mass to zero:
UnityEditor.PopupWindow.Show(massField.worldBound, new PopupExample());
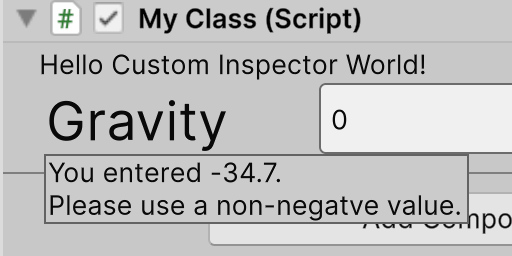
Let Unity compile all your new code, then enter a negative number in the FloatField. You’ll see your PopupWindow appear:
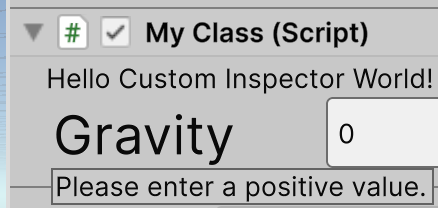
A couple of things to note here: First, you can see that our code has already changed the value to zero. That’s because I added the line to show the window after changing mass, like this:
        if (massField.value < 0)
        {
            massField.value = 0;

            UnityEditor.PopupWindow.Show(massField.worldBound, new PopupExample());
        }
You could make the window appear before setting mass to zero, to give the developer a chance to see what they had entered that made the window appear.
Second, we had to fully qualify the call to PopupWindow.Show with its namespace name. That’s because of that other PopupWindow class in UnityEngine.UIElements. Prefixing PopupWindow.Show with UnityEditor lets the compiler know which of the two we want.
Third, notice that PopupWindow.Show has two arguments. The second is our PopupExample object, which controls what’s in the window. But the first is a Rect structure that defines the boundaries of the FloatField in world space. The PopupWindow.Show method uses that to decide where it’s going to put the PopupWindow. As you can see, it puts it below the FloatField and justifies it at the start of the text (left-justifies, in most of the western world). You can experiment with this to change where the window appears. But the built-in behavior puts the window in a good place to let the developer know which part of the Custom Inspector is reacting to their input.
Finally, note that the second argument to PopupWindow.Show is an object. We don’t have to create it just before we show it. We could create it once and use it repeatedly. This lets us do something even more informative with it. Try this code for your PopupExample:
using UnityEditor;
using UnityEngine.UIElements;

public class PopupExample : PopupWindowContent
{
    public string msg;
    public override VisualElement CreateGUI()
    {
        VisualElement root = new();
        Label info = new Label();
        info.text = $"{msg}";

        root.Add(info);        return root;
    }
}
By adding a public string, we can let MyClassEditor decide what the message will be, with this code:
        if (massField.value < 0)
        {
            massPopup.msg = $"You entered {massField.value}.\nPlease use a non-negatve value.";

            massField.value = 0;

            UnityEditor.PopupWindow.Show(massField.worldBound, massPopup);
        }
For this to work, we need to create the PopupExample object when the CustomInspector loads our MyClassEditor object. That’s easily done by putting this line at the top of the MyClassEditor class:
PopupExample massPopup = new();
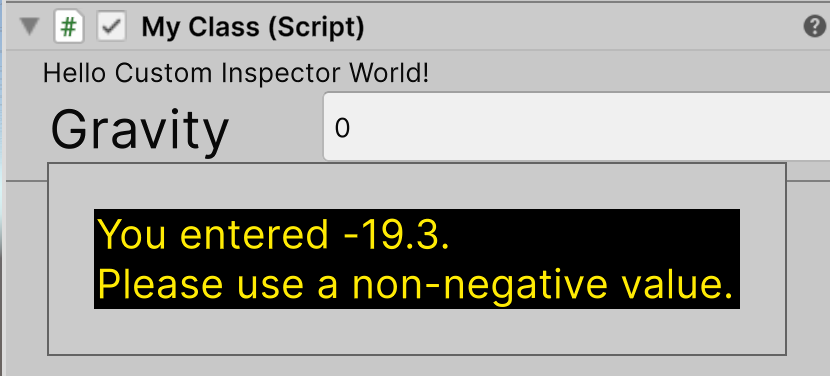
Now, not only does a negative number provide a bit of informative feedback, but it specifically shows the developer what they entered:
You can also use styling on the visual tree that is shown in the PopupWindow:
        Label info = new Label();
        info.text = $"{msg}";
        info.style.fontSize = 18;
        info.style.color = UnityEngine.Color.yellow;
        info.style.backgroundColor = UnityEngine.Color.black;
        info.style.marginTop = 20;
        info.style.marginLeft = 20;
        info.style.marginRight = 20;
        info.style.marginBottom = 20;
Again, don’t get carried away with style options. At least test everything you do with both light and dark themes, to be sure your choices work in each.
The UI Builder
So far, we’ve used C# to create and display everything our Custom Inspector shows the developer. But that’s kind of like working in the dark, because we can’t see what the results are going to look like without running them in the IDE itself. In the next article, we’ll look at using Unity’s UI Builder, which is a graphical tool for creating your visual tree without having to write any C#.
Short addendum: You can have Unity play the system beep in your Custom Inspector with this line of code:
EditorApplication.Beep();
This can draw attention to the fact that there’s a window for the developer to read. Be sure to call that method before calling UnityEditor.PopupWindow.Show. If you call it after that, the sound won’t play.
Leave a comment
Log in with itch.io to leave a comment.