Validate Data in the Custom Inspector
Our original goal was to make sure an angle was within the range [-360,360]. Let’s see how we might do that in our Custom Inspector by enforcing a slightly simpler requirement. We’ll make sure our MyClass object always has a mass that isn’t negative.
Validating Data
What we’ll need is a method that checks our user’s input, a way to run that check when we need to, and some way to respond if the check detects invalid data. In short, we need a way to validate data at the right time.
Here’s a method that can check the data, and force it to be greater than zero.
    private void OnMassFieldBlur(BlurEvent evt)
    {
        if (massField.value < 0)
        {
            massField.value = 0;
        }
    }
Just an if test that sets the value to zero if the user enters a negative number. (You’ll notice that the method takes an argument of type BlurEvent, that it just ignores. More on that in a moment.)
Callbacks and Events
The method does what we want, but we need two more slight additions to our code to get it to run when we want. First, we need to tell Unity to call this method whenever the field loses the focus. That is, when the user enters a new number, and then moves out of the field to do anything else, that’s when we want Unity to call this method. It’s a bit cutesy, but the moment when a field that can get the focus loses that focus is called a “blur” event. (“Focus” versus “blur,” get it?)
To get Unity to call a method when an event happens, we need to “register” that method and associate it with the event. Here’s how:
massField.RegisterCallback<BlurEvent>(OnMassFieldBlur);
In the language of event-handling, the method we register is known as a “callback” method. When the FloatField object referred to by massField loses the focus, Unity will automatically run its callback method. Notice that the argument to RegisterCallback is only the name of the method to call. You don’t use parentheses here. That would cause the method to be called when you try to register it (which the compiler wouldn’t accept anyway). You only want to pass the name.
If you’ve never seen a method name used as an argument to a method, or in any other way without calling the method, you might want to know more about “delegates.” They let methods be passed around in variables, as though they were values. For game developers, delegates unlock two of the most useful design patterns there are: the State pattern and the Strategy pattern. The more you know about those, the better your games will be.
| 💡 Newcomers to event handling sometimes find it a little intimidating to see code that refers to an event without saying more about how they are supposed to know what events can be used to run callback methods. There's a list of them, but even that can be frustrating because it's organized into sets, so you have read page after page to know what they all are. Don't let that worry you! Skim it a bit for now, but you'll pick up the events you need, as you need them, often by looking at sample code. Just remember that Unity has such a list, and you can make Unity call your methods when one of those events occurs. |
Notice that the event is specifically associated with the FloatField in massField. You can associate a different callback method individually for every field you have in your Custom Inspector.
Let the Callback Access Your Data
We need one more slight change to our Custom Inspector for our validation callback to work. The method needs access to the FloatField it’s going to check. So, we will make massField a member of the MyClassEditor class, by moving its declaration out of CreateInspectorGUI and into the class itself. That way, all methods in MyClassEditor will be able to use it. Here’s the complete MyClassEditor class, after all changes have been made:
using UnityEditor;
using UnityEngine.UIElements;

[CustomEditor(typeof(MyClass))]
public class MyClassEditor : Editor
{
    FloatField massField;

    public override VisualElement CreateInspectorGUI()
    {
        VisualElement root = new();

        Label hello = new("Hello Custom Inspector World!");
        root.Add(hello);

        massField = new FloatField();
        massField.label = "Gravity";
        massField.bindingPath = "mass";
        root.Add(massField);

        massField.RegisterCallback<BlurEvent>(OnMassFieldBlur);

        return root;
    }

    private void OnMassFieldBlur(BlurEvent evt)
    {
        if (massField.value < 0)
        {
            massField.value = 0;
        }
    }
}
Remember that massField is bound to the mass member of the MyClass component our Custom Inspector is editing. So, massField.value = 0 has the effect of setting the mass member to zero, as well as its own value being set to zero.
Try it now! Let Unity compile your Custom Editor, then enter a negative number in the field labeled “Gravity,” and notice that your Custom Editor sets the number to zero when you tab or click out of the field. Now your Custom Editor is guarding against invalid input.
Visuals
If you look closely at the two labels in your Custom Editor, you’ll see they’re not horizontally aligned with each other:
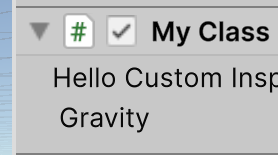
The “G” in “Gravity” is a bit to the right of the “H” in “Hello.” That’s on purpose. Unity wants your fields to be indented a bit from the labels above them. But you may not want that Fortunately, you can adjust it.
In the next article, we’ll take a slight detour and see how to control the visual appearance of labels in our Custom Editor.
Leave a comment
Log in with itch.io to leave a comment.